
When Your Garage Floor Is Cracking, Here’s What to Do First
Epoxy floor patching is the process of filling cracks, spalls, pits, and low spots in a concrete floor using a two-part epoxy compound — restoring a smooth, strong surface before applying a finish coating.
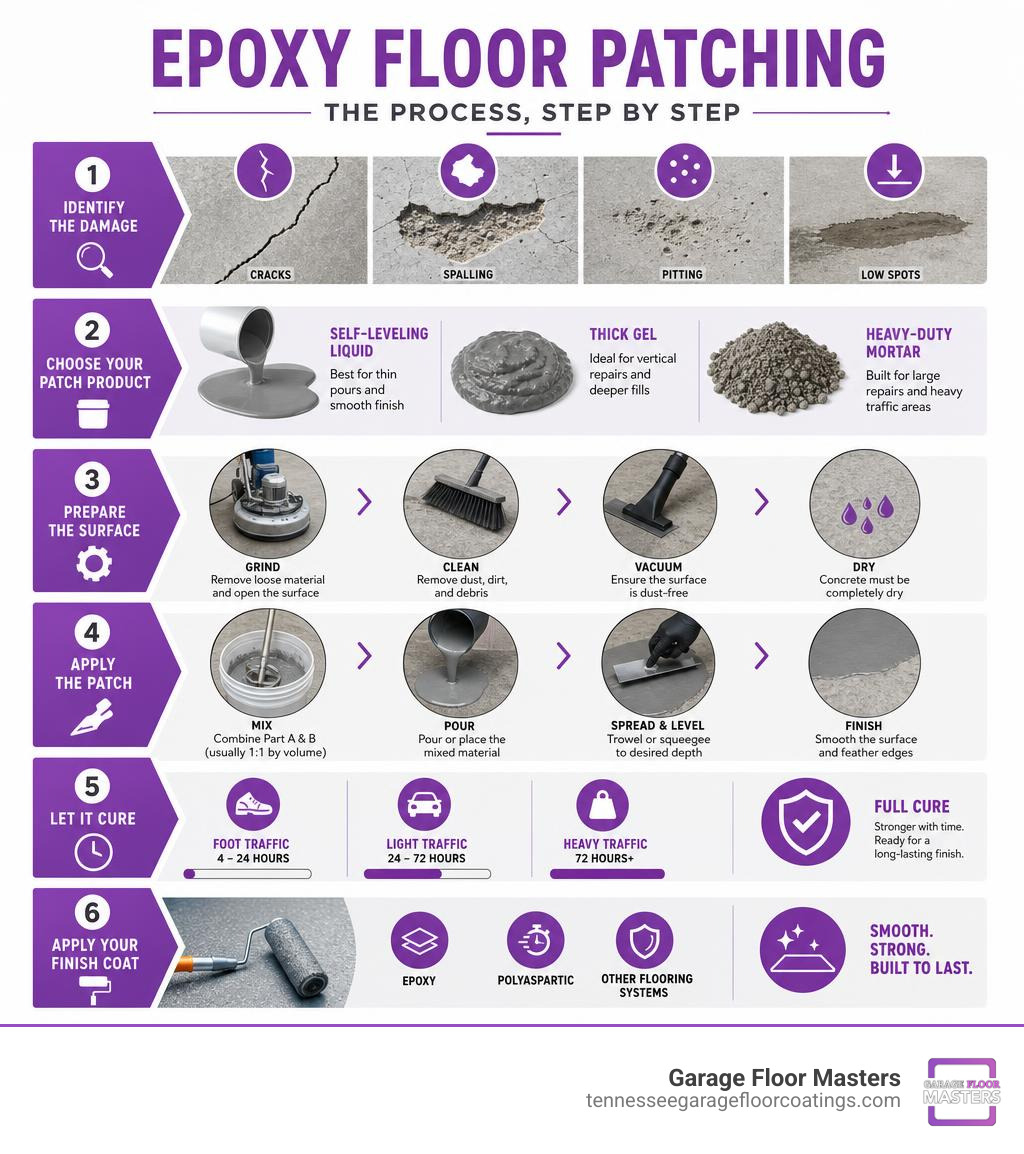
Here’s a quick summary of how it works:
- Identify the damage – cracks, spalling, pitting, or low spots
- Prepare the surface – grind, clean, and dry the concrete
- Mix the epoxy patch – combine Part A and Part B (usually 1:1 by volume)
- Apply and level – trowel, pour, or spread depending on product type
- Let it cure – most patches allow foot traffic in 4-24 hours
- Apply your finish coat – epoxy, polyaspartic, or other flooring system on top
If your garage floor has a crack running across it or a chunk of concrete that’s chipped away, you already know how bad it looks. What you might not know is that leaving it untreated makes it worse — water gets in, freeze-thaw cycles expand the damage, and what started as a hairline crack becomes a serious structural problem.
The good news? Most garage floor damage can be repaired with the right epoxy patch product before it reaches that point.
Not all epoxy patches are the same, though. Some are self-leveling liquids. Some are thick gels. Some are heavy-duty mortars built for forklifts and loading docks. Choosing the wrong one — or skipping proper surface prep — is where most DIY repairs go wrong.
This guide walks you through everything: product types, surface prep, mixing and application, material calculations, and the mistakes that cause patches to fail.
What is Epoxy Floor Patching and When Do You Need It?
Concrete is incredibly strong under compression, but it is inherently brittle and prone to shifting. Over time, moisture, settlement, and thermal expansion take their toll. Epoxy floor patching is a highly effective method used to restore the structural integrity of your slab. Unlike cement-based fillers, epoxy is a resinous polymer that forms an incredibly strong adhesive bond with the concrete, preventing future deterioration.
We typically need to perform epoxy patching when concrete exhibits signs of physical wear, chemical erosion, or structural movement. If you ignore these issues, they can spread, turning simple surface blemishes into deep-seated problems. Understanding the mechanics of garage floor cracking is key to determining whether you are dealing with a simple surface fix or a deeper issue.
When structural movement is involved, knowing the cracked garage foundation causes and risks helps you make an informed decision on whether a patch is enough or if a structural engineer should take a look first.
Identifying Concrete Damage Requiring Epoxy Floor Patching
Not all concrete damage is created equal, and knowing what you are looking at determines how you should patch it:
- Hairline Cracks: These are thin, narrow cracks (often less than 1/16 inch wide) that usually result from concrete shrinkage as it cures. While they don’t threaten structural integrity immediately, they must be filled before applying epoxy garage floor coatings to ensure a seamless finish.
- Deep Spalls: Spalling occurs when the concrete surface chips, flakes, or pops out. This is often caused by freeze-thaw cycles or pressure from rusted rebar inside the slab. Spalls require high-build epoxy mortars to rebuild the missing volume.
- Pitting: Pitting looks like tiny craters peppering your garage floor. It is usually caused by road salt dripping off your car during East Tennessee winters. These small pockets are perfect candidates for low-viscosity, self-leveling epoxy patches.
Types of Epoxy Floor Patch Products and Technical Specs
Choosing the right patching material requires a quick look at the technical specifications of your options. The table below outlines how the three primary types of epoxy patching compounds compare:
| Feature / Spec | Epoxy Gel Kit | Self-Leveling Epoxy | Epoxy Mortar (3-Component) |
|---|---|---|---|
| Consistency | Thick, non-sag paste | Fluid, pourable liquid | Heavy, sand-like trowelable mix |
| Best For | Vertical cracks, joints, wall seams | Pits, spalls, low spots, flat cracks | Deep holes, heavy-traffic loading docks |
| Solids Content | 100% Solids (No shrinkage) | 100% Solids (No shrinkage) | 100% Solids with blended aggregate |
| Compressive Strength | ~8,000 to 9,000 psi | ~9,000 psi | Up to 10,000 psi |
| VOC Emissions | 0 g/L (Low odor) | 0 g/L (Low odor) | Low to 0 g/L |
| Typical Pot Life | 35 to 40 minutes | 30 to 45 minutes | 8 to 15 minutes (Quick-setting) |
| Cure Time (Foot Traffic) | 4 to 8 hours | 2 to 4 hours | 4 to 6 hours (Quick-setting) |
Choosing the Right Epoxy Patching Compound
Matching the product to your specific environment is critical for a patch that lasts:
- Self-Leveling Epoxy: This is a “pour-and-forget” solution. Because of its low viscosity, it flows into cracks and low spots without requiring extensive troweling. It’s perfect for quickly smoothing out pitted areas before applying a topcoat.
- Epoxy Gel: If you have cracks on a vertical step, curb, or sloped garage threshold, you need an epoxy gel. It features a non-sag formula that stays exactly where you put it.
- Epoxy Mortar: When dealing with high-stress areas like loading docks, parking decks, or heavy-traffic warehouse floors, standard epoxies won’t cut it. You need a three-component system (epoxy resin, hardener, and a engineered aggregate like silica sand). These mortars can handle immense physical abuse and boast compressive strengths up to 10,000 psi—nearly three times stronger than standard concrete.
- Cold Storage & Quick-Setting Formulas: If you are patching in cold temperatures (down to 40°F) or need to return a high-traffic lane to service quickly, look for fast-cure compounds. Some specialized formulations can be sanded or coated over in as little as 5 minutes, with a full cure achieved in just one hour.
Step-by-Step Guide to Epoxy Floor Patching
A successful patch is 90% preparation and 10% application. If you try to apply epoxy over dirty, loose, or oily concrete, the patch will peel off like a sticker.
Before you mix your first batch of epoxy, make sure you understand the core techniques of stop the split with these epoxy floor crack repair secrets. For an exhaustive look at the entire restoration process, check out the ultimate guide to permanent garage floor repair.
Preparing the Concrete Substrate
Proper surface preparation is non-negotiable. Follow these steps to prepare your slab:
- Chasing and Grinding: Use a hand grinder equipped with a diamond blade or crack-chasing wheel to open up cracks. Any crack wider than a playing card should be ground out into a clean “V” or “U” shape. This removes weak concrete edges and gives the epoxy more surface area to bond to.
- Debris and Dust Removal: Vacuum the ground-out cracks and spalls using a heavy-duty shop vac with a HEPA filter. Wire brush the interior of the cracks to loosen stubborn grit, then vacuum again.
- Moisture Testing: Epoxy does not play well with trapped moisture. If water is rising through your concrete, it can push the patch right out of the floor. Tape a 2×2 foot sheet of clear plastic to the floor, sealing all edges with tape. Wait 24 hours. If condensation appears under the plastic, you have a moisture issue that must be addressed before patching.
- Profiling: The concrete surface must have a texture similar to 80-grit sandpaper (known as a Concrete Surface Profile of CSP-2 or CSP-3). This mechanical profile is what allows the epoxy to lock onto the substrate. For larger areas, read up on the best ways to fix your garage foundation for good to ensure you are structural prep is correct.
Mixing and Applying the Patching Material
Once your prep is complete, you are ready to mix and apply.
- Measure and Mix: Most floor patch epoxy gels and pastes use a simple 1:1 mixing ratio by volume. Pour equal parts of Part A and Part B onto a clean mixing board or into a bucket. Mix thoroughly using a flat stir stick or a low-speed drill with a paint mixing paddle. Mix for 2 to 3 minutes until the material is a uniform color with no streaks.
- Watch the Pot Life: Once mixed, the chemical reaction begins. A typical epoxy gel has a pot life of about 35 to 40 minutes at 70°F, while quick-setting compounds may harden in as little as 8 minutes. Only mix what you can apply within that window.
- Application: Use a stiff putty knife, margin trowel, or flat squeegee to pack the epoxy tightly into the cracks and spalls. Press firmly to force the material to the bottom of the void, eliminating air pockets.
- Feathering the Edge: Scrape away any excess wet epoxy from the surrounding concrete. You want to “feather” the edges of the patch so it sits perfectly flush with the adjacent floor. If you leave a hump, you will have to spend a lot of time grinding it down after it cures.
Material Calculations and Common Mistakes to Avoid
Before starting, you must know exactly how much material to buy. Underestimating means stopping mid-project, while overestimating wastes expensive resin.

How to Calculate Your Patching Material Needs
To estimate your material needs, use these general industry coverage rates:
- Self-Leveling Epoxy Patch: A typical 2-gallon unit covers approximately 18 sq. ft. at 1/8″ thickness, while smaller individual repair kits cover about 4 to 5 sq. ft. at the same thickness.
- Quick-Setting Mortar: A standard case of quick-set mortar covers about 20 sq. ft. at 1/4″ thickness.
- Epoxy Patching Paste (for cracks):
- For a standard 100 sq. ft. area with normal hairline cracking, you will need about 32 oz of paste.
- For heavy cracking or pitting over 100 sq. ft., plan for 64 oz.
- For a typical 1-car garage (about 290 sq. ft.), normal cracking requires 64 oz, while heavy cracking requires 1 gallon of paste.
- For a standard 2-car garage (about 580 sq. ft.), expect to use 1 gallon for normal repairs and 2 gallons for heavy crack repairs.
- High-Yield Kits: If you are using a thin, high-yield epoxy repair liquid (like a 2-gallon full kit) to fill tight cracks and joints (e.g., 1/8” wide by 1/8” deep), it can cover up to 1,228 linear feet.
Tip: Always add a 10% to 15% waste factor to your calculations to account for material left in mixing buckets or deep voids in the concrete.
Common Mistakes in Epoxy Floor Patching
To ensure your patch lasts as long as the concrete itself, avoid these common pitfalls:
- Poor Mixing: If you don’t mix Part A and Part B thoroughly, or if you don’t get the ratio exactly right, the epoxy will cure unevenly. You’ll end up with sticky, soft spots that will never harden.
- Improper Surface Prep: Applying epoxy over dust, grease, or loose concrete is the number one cause of patch failure. Take your time with the grinder and vacuum.
- Ignoring Temperature: Epoxy is highly temperature-sensitive. Applying standard epoxy in temperatures below 60°F will drastically slow down the cure time, while applying it in direct hot sunlight will cause it to flash-cure in your mixing bucket.
- Exposing to Traffic Too Early: It might look dry on top, but the chemical curing process takes time. Walking or driving on a fresh patch before it has reached its structural cure can crack the bond.
Frequently Asked Questions about Concrete Repairs
How long does it take for an epoxy patch to cure?
Cure times depend heavily on the product formulation and the ambient temperature. At a standard 70°F:
- Light Foot Traffic: Usually allowed within 4 to 6 hours for quick-set formulas, and 24 hours for standard epoxy pastes.
- Light Vehicle Traffic: Wait at least 48 hours before parking a car on a standard patch.
- Full Structural Cure: It takes 3 to 7 days for standard epoxies to reach their full chemical and physical strength (such as 10,000 psi compressive strength).
- Note: Lower temperatures will significantly extend these cure times, while warmer temperatures will shorten them.
Can you coat over an epoxy patch with other flooring systems?
Yes, absolutely! In fact, epoxy floor patching is designed to be a preparatory step. Once the patch is cured, you can coat over it with epoxy, polyurethane, or polyaspartic floor coatings.
Just make sure to sand or grind the cured patch smooth to remove any glossy surface glaze. This creates a mechanical profile that ensures the topcoat bonds securely to the patch.
What is the difference between epoxy patch and polyurea?
While both are excellent concrete repair materials, they have distinct differences:
- Flexibility: Polyurea is highly flexible and can stretch and move with concrete expansion joints without cracking. Epoxy is rigid and high-strength, making it better for structural crack repairs and rebuilding broken edges.
- Cure Speed: Polyurea cures incredibly fast—often ready to sand in 15 to 30 minutes. Epoxy typically takes hours to cure.
- UV Stability: Standard epoxies will yellow or “amber” when exposed to UV sunlight over time. Polyureas and polyaspartics offer superior UV stability.
Conclusion
A smooth, crack-free garage floor is the foundation of a clean, organized home. While patching minor cracks is a project some homeowners tackle themselves, achieving a truly seamless, permanent repair requires precision, specialized equipment, and industrial-grade materials.
If you want the job done right without the hassle, we are here to help. At Garage Floor Masters, we offer professional garage floor coating in Knoxville TN, as well as in Oak Ridge, Crossville, Vonore, Sevierville, Lenoir City, Maryville, Tazewell, LaFollette, Loudon, Friendsville, Powell, Jefferson City, Pigeon Forge, Clinton, Andersonville, and White Pine.
Our high-performance garage floor coatings are UV stable, 4x stronger than standard epoxy, and can be installed in just one day. With over 140 colors to choose from, you can customize your space with a durable, low-maintenance floor built to handle everyday use.
Because every garage floor is unique, pricing varies based on the size of the area, the condition of your concrete, and the specific features you select. That is why we offer a free, no-obligation on-site estimate to give you an accurate, customized quote.
Ready to transform your garage? Contact us today to schedule your free estimate and say goodbye to ugly concrete cracks for good!