
Is a One-Day Polyaspartic Installation Really Possible?
Polyaspartic installation in one day is absolutely real — and it’s not a shortcut. Here’s what you need to know fast:
| Question | Quick Answer |
|---|---|
| Can it really be done in one day? | Yes, for most standard two-car garages |
| How long until foot traffic? | 4–8 hours after final coat |
| How long until you can drive on it? | About 24 hours |
| What makes it so fast? | Polyaspartic chemistry cures 5–20x faster than epoxy |
| Is it as durable as epoxy? | Yes — and often stronger |
| Do I need a professional? | Strongly recommended for best results |
If you’ve ever put off coating your garage floor because you couldn’t stand the idea of parking on the street for a week — you’re not alone. Traditional epoxy systems can take 3 to 7 days before you can even think about driving back in. That’s a long time to rearrange your life.
Polyaspartic coatings change that equation completely. The chemistry behind them allows a trained crew to grind, coat, flake, and seal your floor in a single visit — and you’re parking on it the next morning.
That said, “one day” doesn’t mean “easy” or “cut corners.” The speed comes from the coating’s chemistry, not from skipping steps. Surface prep, moisture levels, temperature, and installer experience all still matter — a lot.
At Garage Floor Masters, we’ve seen what happens when one-day installs go right (stunning, long-lasting floors) and what happens when they go wrong (peeling, delamination, frustrated homeowners). This guide walks you through both sides honestly.
Basic polyaspartic installation one day glossary:
- UV resistant polyaspartic garage
- epoxy garage flooring 3D design Knoxville
- polyaspartic floor specialists TN
The Science Behind a Polyaspartic Installation One Day
To understand how a polyaspartic installation one day is physically possible, we have to look at the underlying chemical structure. Polyaspartic is an aliphatic polyurea. Originally developed in the 1990s to protect steel bridges and heavy industrial equipment from harsh outdoor weathering, this technology was later adapted for concrete floors.
The secret lies in its rapid cure chemistry. Unlike traditional epoxy, which relies on a slow chemical reaction that can take days to fully cross-link, polyaspartic coatings utilize an ester-based catalyst. This reaction is highly efficient and accelerates quickly, allowing the material to firm up in approximately 40 to 60 minutes per layer. This incredibly fast turnaround is what allows installers to move between the prep, basecoat, flake broadcast, and topcoat phases in a single afternoon instead of waiting 12 to 24 hours between steps.
Another critical factor is viscosity. Standard polyaspartic formulations are engineered to have a low viscosity, meaning they are thin enough to penetrate deep into the microscopic pores of the concrete. This deep penetration creates an anchor-like mechanical bond that is incredibly difficult to break.
To see how these two heavy-duty systems stack up, let’s look at the numbers:
| Performance Metric | Traditional Epoxy Systems | Professional Polyaspartic Systems |
|---|---|---|
| Cure Time (Foot Traffic) | 12 to 24 Hours | 4 to 8 Hours |
| Cure Time (Vehicle Traffic) | 3 to 7 Days | 24 Hours |
| Application Thickness | 4 to 6 Mils (Standard DIY) | 10 to 16 Mils (Professional Multi-layer) |
| Tensile Strength | 1,200 – 1,500 PSI | Over 4,000 PSI |
| Adhesion to Concrete | Baseline Bond | 6x Stronger Bond than Epoxy |
| UV Resistance | Poor (Yellows/Chalks in Sunlight) | Excellent (100% UV Aliphatic Chemistry) |
| Flexibility | Rigid (Can crack with concrete shift) | High Elongation (Bends without cracking) |
For a deeper dive into these materials, you can read more about how they work on our dedicated Polyaspartic Floor Coatings page.
Why a Polyaspartic Installation One Day Outperforms Traditional Epoxy
When homeowners in East Tennessee are comparing concrete coatings, the conversation almost always starts with epoxy. But traditional epoxy has some serious limitations. Beyond the agonizingly slow cure speed, epoxy is incredibly rigid. As concrete expands and contracts with East Tennessee’s seasonal temperature swings, a rigid epoxy coating can crack under the stress. Polyaspartic, on the other hand, possesses high elongation properties, meaning it moves with the concrete rather than fighting it.
Furthermore, epoxy is notorious for “hot tire pickup.” When you drive your car on a hot summer afternoon in Knoxville, your tires absorb heat from the asphalt. When you pull into your garage, that heat is transferred to the floor. Under the weight of the vehicle, hot tires can actually melt or soften traditional epoxy, causing it to peel off the floor when you back out. Polyaspartic coatings are highly thermal-resistant and do not soften under hot tires.
Finally, there is the issue of sunlight. Traditional epoxy is highly sensitive to ultraviolet (UV) light. If your garage gets any natural sunlight, the exposed epoxy will quickly turn an unsightly shade of amber or yellow. Polyaspartic is inherently UV-stable, meaning your garage floor will stay bright and beautiful for decades. This is one of the many reasons why so many homeowners agree on Why Polyaspartic is the Knoxville King of Concrete Coatings.
Understanding Polyurea vs. Polyaspartic Formulations
It is common to hear the terms “polyurea” and “polyaspartic” used interchangeably, but they are not exactly the same thing.
Pure polyurea is an incredibly fast-curing polymer. In fact, it cures so fast (often in a matter of seconds) that it must be applied using specialized spray equipment. This makes pure polyurea virtually impossible to apply smoothly on a residential garage floor using traditional hand tools.
Polyaspartic is actually an aliphatic polyurea. Chemists modified the molecular structure of polyurea by adding hindered amines, which effectively slows down the curing process. This creates a “working window” of about 30 to 45 minutes. This engineered delay gives professional installers just enough time to pour, squeegee, and roll the coating flat, ensuring a smooth, seamless finish without losing the rapid-cure advantages of the material. For a full breakdown of the chemical nuances, check out our guide on Polyurea vs Polyaspartic Coat.
The Step-by-Step Timeline of a Rapid Floor Transformation
A successful polyaspartic installation one day is a highly coordinated dance. Because the materials cure so rapidly, there is absolutely no room for error or hesitation. Our crews operate like a well-oiled machine, dividing tasks to ensure that every square foot of your floor is prepared and coated within the precise chemical windows required.

To give you an idea of how we pull off this transformation in a single day, here is a look at Our Process from start to finish.
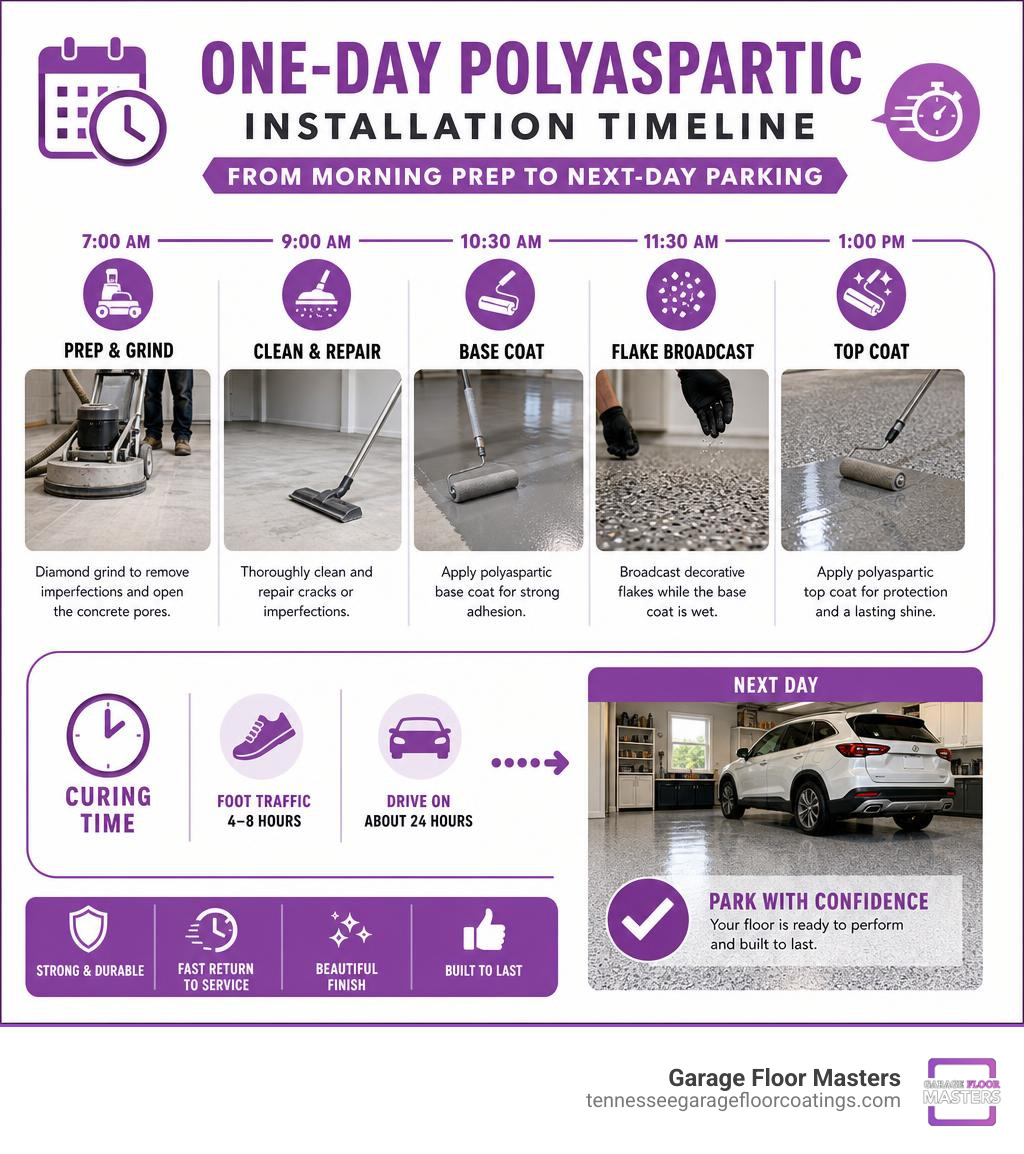
Morning Prep: Setting the Stage for a Polyaspartic Installation One Day
Any experienced concrete professional will tell you that 80% of a coating’s success comes down to surface preparation. If you do not prepare the concrete correctly, even the most expensive industrial-grade polyaspartic will eventually peel off.
- Arrival & Inspection (7:00 AM – 8:00 AM): The crew arrives, unloads the equipment, and performs a final moisture check on your concrete.
- Mechanical Diamond Grinding (8:00 AM – 10:00 AM): We do not use acid etching, which introduces unwanted moisture into the concrete. Instead, we use heavy, 800-pound planetary diamond grinders equipped with industrial HEPA vacuum shrouds that capture 99% of the concrete dust. This process removes old paint, sealers, and the weak top layer of concrete (called laitance) to reveal a clean, porous surface.
- Achieving the Right CSP (Concrete Surface Profile): Our goal is to achieve a Concrete Surface Profile of 2 to 3 (CSP 2-3), which feels like medium-grit sandpaper. This profile increases the surface area and boosts coating adhesion by 300% to 400%.
- Crack and Spall Repair (10:00 AM – 11:00 AM): We chase out hairline cracks with a diamond blade and fill them with a rapid-curing polyurea joint filler. Once cured, we grind these repairs flush with the surrounding floor so they disappear completely under the final coating.
You can learn more about why these prep steps are so vital by reading about our complete Garage Floor Installation Process.
Midday Application: Basecoat and Flake Broadcast
Once the prep work is complete and the floor has been thoroughly vacuumed to remove any micro-dust, it is time to apply the base layer.
- Mixing and Application (11:30 AM – 12:30 PM): We mix our high-performance polyurea basecoat. Because of the quick cure times, this material must be applied immediately using the “dip and roll” method. One installer pours the mixed material in ribbons while another squeegees and backrolls it to a uniform thickness.
- Broadcasting the Flakes (12:30 PM – 1:00 PM): While the basecoat is still wet and tacky, we broadcast decorative vinyl flakes “to rejection.” This means we throw an excess of flakes into the air, letting them rain down onto the floor until the entire surface is completely covered. This full-broadcast method ensures a uniform texture, hides minor concrete imperfections, and adds a durable layer of thickness to the floor.
This stage is where the magic of rapid curing shines. For a closer look at this phase, explore Blink and It’s Dry with Fast Drying Polyaspartic Floors.
Afternoon Finish: Scraping and Topcoat Application
After letting the basecoat and flake layer cure for about an hour, the floor is solid enough to walk on. Now, we prepare it for the final protective layer.
- Flake Recovery and Scraping (2:00 PM – 3:00 PM): We sweep and vacuum up the excess, loose vinyl flakes that did not adhere to the basecoat. Next, our crew uses flat steel scrapers to scrape the floor in multiple directions. This knocks down any vertically standing flakes, smoothing out the texture while maintaining a slip-resistant profile.
- Applying the Polyaspartic Topcoat (3:00 PM – 4:30 PM): We apply a clear, 100% solids polyaspartic topcoat over the scraped flakes. This topcoat seals the flakes, providing a high-gloss, chemical-resistant barrier. The finished floor has a slight “orange peel” texture, which provides excellent traction even when wet.
Weighing the Pros and Cons of Fast-Curing Systems
While a polyaspartic installation one day is highly convenient, it is important to look at the system objectively. No single flooring system is perfect for every single scenario.

To help you decide if this fast-curing option is right for your home, let’s explore the benefits and the potential risks of these rapid systems. We highly recommend checking out our guide on UV Resistant Polyaspartic Coatings for a Sunproof Garage to see how these systems perform long-term.
Potential Risks of a Rushed Polyaspartic Installation One Day
The primary risk of a one-day installation is not the material itself, but rather the potential for installers to rush through critical diagnostic steps.
- Moisture Vapor Transmission: Concrete is porous, and moisture from the ground can travel upward through the slab. If there is high hydrostatic pressure, moisture vapor can push against the bottom of the coating. Because polyaspartic cures so quickly, it may not penetrate as deeply as a slower-curing epoxy if the concrete has not been ground to the correct profile. If moisture levels are too high, this vapor pressure can cause the coating to delaminate or bubble.
- Narrow Application Windows: If the temperature rises unexpectedly during installation, the working time of polyaspartic shrinks dramatically. If the crew is not fast enough, they can miss the inter-coat adhesion window, leading to weak bonds between the basecoat and topcoat.
- Skipped Prep: Some low-quality contractors use the “one day” promise to justify skipping diamond grinding, opting instead for quick acid washes. This almost always leads to premature floor failure.
Why Some Experts Recommend an Epoxy Primer Hybrid System
Because of the moisture risks associated with fast-curing coatings, some concrete experts advocate for a hybrid approach.
In a hybrid system, a slow-curing, high-build epoxy primer is applied directly to the concrete first. Because epoxy cures slowly, it has ample time to “wet out” and sink incredibly deep into the concrete pores, creating a massive mechanical bond that acts as an excellent moisture vapor barrier. Once the epoxy primer is cured, a polyaspartic topcoat is applied over it to provide the necessary UV stability, scratch resistance, and gloss.
While this hybrid system is incredibly durable, it cannot be completed in a single day. The epoxy primer must cure overnight before the polyaspartic topcoat can be applied. For homeowners who are not in a rush and want the ultimate protection against high sub-slab moisture, this is a phenomenal option. You can learn more about how to manage these steps by reading Mastering Your Next Epoxy Floor Coating Install Without the Mess.
Frequently Asked Questions About One-Day Floor Coatings
How long does it take to cure before I can drive on it?
This is the biggest selling point of a polyaspartic floor. While traditional epoxy requires you to wait 3 to 7 days before parking your car, a professional polyaspartic floor is ready for light foot traffic in just 4 to 8 hours.
You can walk on it in clean socks or shoes by the evening of your installation. As for your vehicles, you can park on the floor exactly 24 hours after the final topcoat is applied. This rapid return-to-service is why so many homeowners choose this system over epoxy. For more tips on getting your garage back in action quickly, read our article on how to Get Back on the Road with Fast Dry Garage Epoxy.
What environmental conditions are required for a successful installation?
Polyaspartic coatings are incredibly versatile, but they are still bound by the laws of chemistry.
- Temperature: Professional polyaspartic can be installed in temperatures ranging from 50°F to 90°F. However, if the temperature is above 85°F, the curing process accelerates rapidly, requiring an incredibly fast and experienced crew to prevent roller marks.
- Humidity: Polyaspartic coatings cure by reacting with moisture in the air. If the relative humidity is above 80%, the coating will cure much faster, shrinking the installer’s working window.
- Concrete Moisture Content: The concrete slab must be completely dry. We perform moisture testing (using calcium chloride or electronic moisture meters) before mixing any materials. If the concrete moisture content is above 4.5%, we must apply a moisture-mitigating primer first to prevent future bubbling.
How do I choose a qualified installer in Tennessee?
Because of the fast cure times, a one-day polyaspartic install is not a DIY-friendly project. It requires specialized equipment and a highly trained crew. When looking for the right team in the Knoxville area, look for:
- Certified Installers: Ensure the crew has been formally trained by the manufacturer of the coatings they use.
- Industrial Equipment: The company should use heavy planetary diamond grinders with commercial dust collection systems, not simple hand sanders or pressure washers.
- Comprehensive Warranties: A quality installer should offer a robust warranty (often 15 years to lifetime) covering peeling and UV fading.
If you are looking for local experts in East Tennessee, we recommend reading our guide on Finding the Best Polyaspartic Floor Specialists in Tennessee.
Conclusion
A polyaspartic installation one day is the ultimate solution for busy homeowners who want a beautiful, industrial-strength garage floor without the week-long headache of traditional epoxy. By leveraging advanced aliphatic polyurea chemistry, professional crews can transform a stained, cracked concrete slab into a pristine, low-maintenance showroom in a matter of hours.
At Garage Floor Masters, we proudly serve homeowners across East Tennessee, including Knoxville, Oak Ridge, Maryville, Loudon, Powell, and Lenoir City. Our high-performance coatings are 4x stronger than standard epoxy, 100% UV-stable, and available in over 140 custom colors to match any aesthetic.
Because every concrete slab has a unique history, our pricing is based entirely on the size, condition, and specific features of your project. That is why we are happy to provide a completely free, no-obligation on-site estimate to assess your concrete and help you design the perfect floor.
Ready to reclaim your garage? Visit our Garage Floor Coating Knoxville Tennessee page to schedule your free consultation today!